Sunday, October 9, 2011

Bread, bread, and more bread

Decided to expand on my bread making skills this week and was able to make some great hamburger & hot dog buns. Made the usual batch of bread but instead of hand mixing I used the "dough" setting on my bread maker. 1) Made it much easier 2) took a bit longer 3) I think we like the taste better.
um good
Me making hamburger buns
2 of the 8 buns ready to rise
baked and cooling - sooo cute!
hot dog buns

I only made one batch of the recipe below and just divided it in half (half for hot dogs and half for hamburgers) Next time I will make only 6 hamburger buns and keep it at 8 hot dog buns. I will also only cook the buns for about 9 minutes to get a little less brown. I know it may look complicated but will a little helper in the kitchen it is not problem at all. Best of all the bread tastes really good.

Burger or Hot Dog Buns
recipe image
Rated: rating
Submitted By: Sally
Photo By: LuisasCatering
Prep Time: 20 Minutes
Cook Time: 10 Minutes
Ready In: 1 Hour 30 Minutes
Servings: 12
"These yeast buns will lend a gourmet touch to your next barbecue -everyone will want to know where you bought them!"
Ingredients:
1 cup milk
1/2 cup water
1/4 cup butter
4 1/2 cups all-purpose flour
1 (.25 ounce) package instant yeast
2 tablespoons white sugar
1 1/2 teaspoons salt
1 egg
Directions:
1.In a small saucepan, heat milk, water and butter until very warm, 120 degrees F (50 degrees C).
2.In a large bowl, mix together 1 3/4 cup flour, yeast, sugar and salt. Mix milk mixture into flour mixture, and then mix in egg. Stir in the remaining flour, 1/2 cup at a time, beating well after each addition. When the dough has pulled together, turn it out onto a lightly floured surface, and knead until smooth and elastic, about 8 minutes.
3.Divide dough into 12 equal pieces. Shape into smooth balls, and place on a greased baking sheet. Flatten slightly. Cover, and let rise for 30 to 35 minutes.
4.Bake at 400 degrees F (200 degrees C) for 10 to 12 minutes, or until golden brown.
5.For Hot Dog Buns: Shape each piece into a 6x4 inch rectangle. Starting with the longer side, roll up tightly, and pinch edges and ends to seal. Let rise about 20 to 25 minutes. Bake as above. These buns are pretty big. I usually make 16 instead of 12.


Cowboy Candy

To use up some more of the peppers I decided to give Cowboy Candy a try, here is the recipe:

not my photo
Ingredients
  • 3 pounds Firm, Fresh Jalapeno Peppers, Washed
  • 2 cups Cider Vinegar
  • 6 cups White Granulated Sugar
  • ½ teaspoons Turmeric
  • ½ teaspoons Celery Seed
  • 3 teaspoons Granulated Garlic
  • 1 teaspoon Ground Cayenne Pepper

Preparation Instructions

Wearing gloves, remove the stems from all of the jalapeno peppers. The easiest way to do this is to slice a small disc off of the stem-end along with the stem. Discard the stems.
Slice the peppers into uniform 1/8-1/4 inch rounds. Set aside.
In a large pot, bring cider vinegar, white sugar, turmeric, celery seed, granulated garlic and cayenne pepper to a boil. Reduce heat and simmer for 5 minutes. Add the pepper slices and simmer for exactly 4 minutes. Use a slotted spoon to transfer the peppers, loading into clean, sterile canning jars to within 1/4 inch of the upper rim of the jar. Turn heat up under the pot with the syrup and bring to a full rolling boil. Boil hard for 6 minutes.
Use a ladle to pour the boiling syrup into the jars over the jalapeno slices. Insert a cooking chopstick to the bottom of the jar two or three times to release any trapped pockets of air. Adjust the level of the syrup if necessary. Wipe the rims of the jars with a clean, damp paper towel and fix on new, two-piece lids to finger-tip tightness.
If you do not want to can these to the point of shelf stable, you can simply put the jars in your refrigerator and store them there. I prefer to keep the fridge space free so I can them. If you wish to can them, follow the instructions below.
Note: If you have leftover syrup, and it is likely that you will, you may can it in half-pint or pint jars, too. It’s wonderful brushed on meat on the grill or added to potato salad or, or, or … in short, don’t toss it out!
To can, place jars in a canner and cover with water by 2-inches. Bring the water to a full rolling boil. When it reaches a full rolling boil, set the timer for 10 minutes for half-pints or 15 minutes for pints. When timer goes off, use canning tongs to transfer the jars to a cooling rack. Leave them to cool, undisturbed, for 24 hours. When fully cooled, wipe them with a clean, damp washcloth, then label.
Allow to mellow for at least two weeks, but preferably a month before eating. Or don’t. I won’t tell!

Instead of using half pints we used quarter pints and we reduced the recipe by half; ending up with a total of nine quarter pints and one half pint of extra syrup. Still have another week before we can try it...

Fermentation

So we decided to expand on our food preservation skill and can now say that we are learning to ferment things. To ferment you pretty much just slice or shred up some veggies and salt them (sea or kosher salt) and let them rot. So far we have done:
Sauerkraut (spicy ~ with jalapeno, black pepper, and garlic)
Ginger Carrots

Curtido ~ like a Spanish kraut

Beets and Turnips

I can report that the Curtido turned out amazing! Next batch I will reduce the oregano to only one teaspoon because Paul thinks it tastes like soap ~ me, I like it! The ginger carrots are good but I wish they were a bit more "sour". The beets/turnips were kinda a dud, they weren't quite sour enough either. Next time I will slice them thinner and cut them in half and maybe ferment for a little longer. I may even shred them so it's more like a red slaw. Hmmm, so many options. Just make sure that you do the research Paul and I have to make sure your food will be safe and hopefully taste good.


Fire


Enjoying a nice fire...a nice big, a really big hot, I mean holly crap Paul, my legs are on fire!!

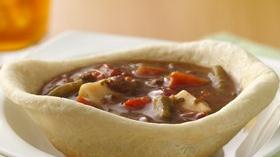
Bread Bowls with Soup

Bread Bowl Soup
Bread Bowl Soup
Bread bowls made with Pillsbury® crusty French loaf are great for soup or chili!                       
INGREDIENTS:
1 can Pillsbury® refrigerated crusty French loaf
2 cans (18.5 oz each) Progresso® Rich & Hearty beef pot roast with country vegetables or chicken
DIRECTIONS:
  • Heat oven to 400°F. Place 4 (10-oz) custard cups upside down on ungreased cookie sheet; spray outsides of cups with cooking spray.
  • Cut loaf of dough crosswise into 4 equal pieces. Press or roll each piece into 6-inch round. Place each round over custard cup on cookie sheet, shaping dough to fit around cup and form bowl shape. Dough should not touch cookie sheet.
  • Bake 11 to 13 minutes or until golden brown. Place bread bowls with custard cups on cooling rack; cool 5 minutes. Remove bowls from cups.
  • Meanwhile, in 2-quart saucepan, heat soup over medium heat until hot.
  • Place bread bowls in shallow soup bowls or pasta plates. Ladle soup into bread bowls; serve immediately.

and here is how mine turned out...
Sirloin burger with country vegetables
Tomato Bisque

So since it is just the two of us I doubled up the bread bowls and only made two and since I don't have any of those deep dish bowl/plate things we had to make due with pie plates. Tasted awesome and was great for a quick filling meal - almost to much for one person to eat.

More peppers

peppers, peppers, and more peppers ~ good thing we love spicy stuff!
Paul allowing yet another photo - impressive :)
peppers pre sort
peppers all sorted
habanero peppers hanging inside to ripen - about 100 on vine
pico made from just some of the peppers


Bread and Peppers

Just some photos
bread rising
maybe rising a little too much...
conjoined twins
Peppers
drained and cleaned


Saturday, September 24, 2011

Rice bag for aches and pains

So after much searching (not really, found it on the www.instructables.com) I decided to make a rice bag. Mostly I think will use this for my neck and back. As you may be able to guess, I'm not the best at this kind of thing so it took a few tries and some help videos but I was able to make this in about an hour.

Rice bag (10"x10")

Rice bag and nifty pillow case made from an old t-shirt

rice bag in pillow case

Biscuits

My first attempt at biscuits turned out pretty good. I think I will look around a bit more for another recipe or maybe just change up the one I used today (buttermilk instead of regular milk).

not too much of a mess ~ notice the mason jar ring

made 5 1/2 biscuits

Maybe should have baked a couple more minutes to brown up the tops but I was afraid to burn them.

super sexy me cooking

and my super sex hubby, Paul

Sunday, September 18, 2011

Bread done right

So I took another shot at the one hour bread recipe I goofed up last week and it turned out perfectly.
Bread
I made sure not to add too much yeast this time and I also used bread pans this go round. Directions only said to let it rise for 25 minutes but I think next time I'll do around 35-45min. At least now we can make a sandwich that will fit in our lunch boxes. I also made some homemade butter this morning - soooo good on the fresh bread.

Jalapeno Jelly

So today I decided to try my hand with jalapeno jelly and it turned out amazing! This was also the first time I have canned by myself and I think I much prefer a helper being around.
Jalapeno Jelly = yummy
So this isn't the kind of jelly that you just put on a PB&J but it is great over cream cheese that is slathered on crackers. Even Paul likes it, and he doesn't like anything sweet.

Something Special...

So we save a lot of money by not eating out very often (took me a while to get used to that). So to make up for not going out we have become creative.
Sushi Roll - wrapper, rice, zucchini, red bell pepper, jalapeno, cream cheese, and... taco meat

same as above just minus the taco meat
I will be honest and say that while both were good, the taco meat one was way better! :)

Monday, September 12, 2011

Baking!

So one way to conserve/reduce what we spend money on is to learn to make stuff ourselves (me more so in this case). So I've taken up baking, so far, so good.

NY Times: No Knead Bread ~ first attempt, way to crusty - bread should not hurt when you eat it!

Round two: way, way, way better :) even looks better

Yummy, this has got to be the best white bread that I can remember eating. Notice how I had to try it before I took the picture.
Recipe makes two loaves, next time I think I will use bread pans to get a more "sandwich" shape bread.

Fresh homemade tortilla, don't think we will be buying any store bought ones any time soon.

Baked taco patty pan

In the beginning...

Here is where we started. We constructed a couple of 4' x 8' raised beds and some buckets and flower pots.
Two raised beds
All the left over seedlings
Potatoes
And here is where we were about a month, month and a half ago
Tomatoe plants that did not get nearly enough trellis to grow on (and look at Paul running away from the camera :)
The best zucchini plant ever!
Zucchini plants make anyone into a gardener.
Jalapeno peppers, Serrano peppers, banana peppers, habanero peppers, and Cayenne peppers (and one little artichoke that refused to grow bigger than that)
And this is where we are today ~ notice the greenhouse in progress

Peppers and three late green bean plants
peppers
more peppers
the basil is all that is left from what use to be the tomatoe bed
Don't worry, the tomatoes went on to become...

hot sauce
and more hot sauce! 2 & 1/4 gallons to be exact.
Some of the more ripe tomatoes from earlier in the season went on to make some great tomatoe sauce (turned out more like pizza sauce, but hey, I'm not complaining)

Note to self: do not only plant small tomatoes, big ones would be nice too...

Pickled zucchini, pickled green tomatos, and pickled peppers (lots of pickled peppers!)